
Friday, 16 January, 2026г.


Где искать: по сайтам Запорожской области, статьи, видео ролики
пример: покупка автомобиля в Запорожье
etrailer | Trailer Hitch Installation - 2015 GMC Terrain - Draw-Tite
 У вашего броузера проблема в совместимости с HTML5
Click for more info and reviews of this Draw-Tite Trailer Hitch:
https://www.etrailer.com/Trailer-Hitch/Draw-Tite/36408.html
Check out some similar Trailer Hitch options:
https://www.etrailer.com/fitguide.htm
Search for other popular GMC Terrain parts and accessories:
https://www.etrailer.com/vehicle/2015/GMC/Terrain
https://www.etrailer.com
Don’t forget to subscribe!
https://www.youtube.com/user/etrailertv
Full transcript: https://www.etrailer.com/tv-install-trailer-hitch-2015-gmc-terrain-36408.aspx
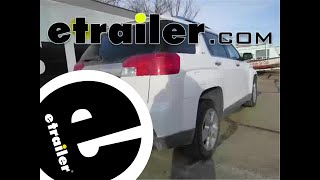
Today on our 2015 GMC Terrain we'll be installing the Draw-Tite class two 1-1/4" receiver tube hitch, part number 36408. Here's what our hitch is going to look like once it's installed. As you can see, we cannot reinstall the rear fascia as our hitch sits in that place, but all in all really all we can see is the receiver tube and the chain hold downs, which makes it really nice that we don't have a hitch sticking out. It also is recessed underneath the bumper so we don't have to worry about hitting our leg or shin on it. Visually it's a really nice hitch. Along with the nice black powder coating we've got a square crosstube design with a fully welded hitch.
This hitch is capable of up to 300 pounds of tongue weight and 3,500 pounds of towing capacity. Next I'll go ahead and give you a couple measurements to make it easier to select accessories for your new hitch. From the center of the hitch pinhole to the outermost edge of the bumper is 3-3/4". From the top of the receiver tube opening to the ground is 14-3/4". This will assist you with selecting accessories such as a ball mount, bike rack, or cargo carrier. To begin our install we're first going to remove the lower rear access panel here in the fascia. There are a couple tabs that we'll just simply press and pull down.
Then there's fasteners underneath that we'll have to pop free. Now once you remove this we're going to go ahead and set it aside, as it will not be reinstalled because our hitch will sit in this location. Next we'll go ahead and point out the attachment points. We're going to have a total of six attachment points. Two will use the pre-drilled holes here in the bottom of the steel bumper, and then there will be two on each side of the frame frail. These attachment points here in the side of the frame are weld nuts built into the frame by the manufacturer. Now before we attempt to install the new hardware we're going to want to clean the weld nuts out because over time they're going to build up with rust, dust, dirt and debris.
To clean them out we're going to use a spray lubricant. Once we hit the weld nuts with the spray lubricant we're going to use our 1/2" nylon tube brush, part number 814092, and use the tube brush to thoroughly clean any buildup off those weld nuts. Quick tech tip: It's recommended to take one of the new fasteners and thread it into the weld nut to make sure they're going to go nice and easily. Now for our center attachment points here our hardware is going to be a 1/2" carriage bolt and block that will go through the bumper channel and down through the pre-drilled hole. Then once it goes through the hitch we'll secure it with a conical tooth washer and nut. The teeth of the washer will face the hitch.
To get our hardware in place we'll use the 1/2" bolt leader supplied with our install kit. Note that the bolt leaders can be a little short and can be difficult to get our hardware in place, so what I recommend to do is take a piece of wire and add to the bolt leader. This will make it easier to get your hardware in place. We'll go ahead and start by getting our hardware in position, taking the bolt leader, feeding it through the attachment point, and out the end of the bumper channel. Now once we have access to the end we'll take our block, slide it onto the pull wire first, and then thread the carriage bolt into the end. We'll feed the block and carriage bolt into the frame separately and then use the pull wire to pull them into place. Now once we have it in position we'll go ahead and remove our bolt leader and repeat the same process on the other side. Now with the carriage bolts in place our hardware for securing the hitch on the side frame attachment points will be the new 12mm bolt and 1/2" conical tooth washer. The teeth of the washer again will face the hitch as it will go through the pre-drilled holes in the hitch and then into the weld nut. We'll now go ahead and get an extra set of hands to help us put the hitch up in place. Keep in mind when putting your hitch in place not to push the center attachment point hardware back up into the frame. Now that we've got our bolts here on the driver side we'll go ahead and repeat the same process on the passenger side. With the frame attachment points in place we'll now move to the center of the bumper and put our conical tooth washer and nut to hold the center attachment points. Note as we put the conical tooth washer on, I will put a little si
Теги:
Installation of a Trailer Hitch on a 2015 GMC Terrain Trailer Hitch Installation - 2015 GMC Terrain - Draw-Tite Trailer Hitch Concealed Cross Tube 1-1/4 Inch Hitch Custom Fit Hitch Class II 300 lbs TW 3500 lbs GTW Draw-Tite 36408 Class II Hitch trailers trailer hitches vehicles towing RV supplies heavy-duty towing supplies trailer parts bike racks cargo carriers step bars
Похожие видео


Мой аккаунт