
Tuesday, 13 January, 2026г.


Где искать: по сайтам Запорожской области, статьи, видео ролики
пример: покупка автомобиля в Запорожье
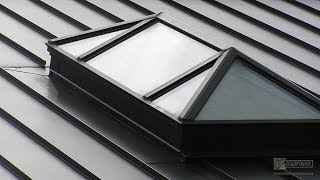
Standing Seam Metal Roofing. How to Install Standing Seam Metal Roofing. Standing Seam. ♦DIY CAM♦
 У вашего броузера проблема в совместимости с HTML5
Watch the Video "How to Make a Nano Aquarium" - https://youtu.be/EgvocALYXc0
Standing Seam Metal Roofing. How to Install Standing Seam Metal Roofing. ♦DIY CAM♦
These instructions specifically focus on metal panel installation. To learn more about eave trim and cleat installation, view our other how-to videos. The panel used in this example is a 16-inch coverage panel with a nail flange. We will show you how to install these metal panels with both exposed fasteners and hidden fasteners.
Exposed Fastener Installation
Step 1: Start Square
When you're installing a metal roofing panel, the first thing that you want to do is make sure you're starting square. This means that your vertical lines are all running square to your eave.
It’s important to start square because if the first panel is tilted a little bit, all the panels that come after are going to be tilted as well. When you're starting the roof, you want to square off the edge and adjust your panel if necessary. For example, if this particular roof was off a little bit, even by just half an inch, I would tilt our panel a little bit so that we ran square, starting with the first panel.
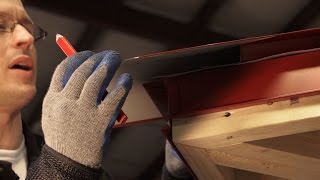
Step 2: Cut Panel to Length & Add Eave Trim
The panel we are using is too long. When you're doing an exposed fastener eave installation, you want to overhang the eave by one and a half or two inches at most. Put your tape up against the end wall and measure down to the edge of your eave trim. For this example, it’s exactly 24 inches, and I'm going to add an inch and a half to that measurement and cut my panel to length.
To do so, flip the panel over and make marks on the reverse side. I had said that the measurement was 24 inches and that I needed to add an inch and a half to that, so I'm going to make a mark at 25.5 inches. I'm going to do the same on the other side at 25.5 inches. Using a square or a straight edge, you can then join those two lines to create your cut-line.
Next, you need to cut through the male and the female rib to get to the flat of the panel. Using my duckbill snips to ensure a nice clean edge, I'm going to come through the flat of the pan. Make sure during this process that you are wearing your gloves. Last, cut the female rib. Now we have a panel that's been cut to 25.5 inches so that 1.5 inches can overhang at the eave, and we’re ready to install it.
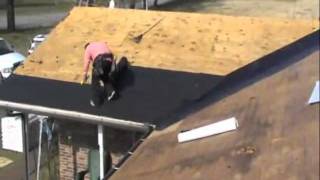
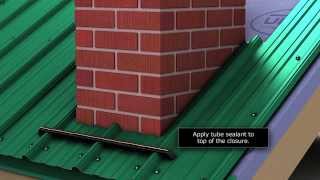
Step 3: Apply Sealant Tape
This panel is 25.5 inches long so that 1.5 inches overhangs the eave, and between the eave trim and the underside of the panel, we're going to apply one row of sealant tape. Remember, sealant tape goes between all layers of metal. Apply the sealant tape along the center of the entire eave and remove the tape backing.
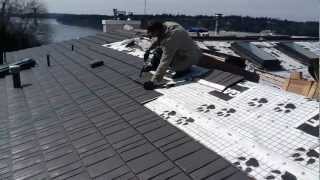
Step 4: Installation Using Exposed Fasteners
Now we can install our roof panels. Make sure the panel is square to the eave of the roof so that all of panels installed afterwards are straight. Next, put a screw into the fastening strip to keep it steady before installing the screws along the face. It's the low-profile head that won’t dimple the next panel when it comes up. Spaced at 12 inches from fastener to fastener, tighten them but don't over-tighten.
Step 1: Install Offset Cleat
Step 2: Bend Panel Edge
Step 3: Installation Using Hidden Fasteners
CHANNEL FOR CREATIVE #DIY_CAM - https://goo.gl/aOvsY2
This channel is created for those who love life, who love to create with their own hands for independent, purposeful and creative people. The content of the channel will consist of videos, which will show you how to do various things with their hands. And the video will touch completely different areas of activity, the main condition - "do it yourself".
PLAYLISTS OF CHANNEL:
1. CARS AND MOTOCYCLES - https://goo.gl/R974eu
2. CONSTRUCTION AND REPAIR - https://goo.gl/KkvFu9
3. MOBILE DEVICES AND COMPUTERS - https://goo.gl/7PYuGk
4. DIY - https://goo.gl/s7KKEb
Follow us in:
FACEBOOK - https://goo.gl/1cDIqR
TWITTER - https://goo.gl/9zmdV7
VK - https://goo.gl/1N6VJ8
OK - https://goo.gl/2xWJtQ
INSTAGRAM - https://goo.gl/i972mY
GOOGLE + - https://goo.gl/BU72No
LIVEJOURNAL - https://goo.gl/S6LijG
TUMBLR - https://goo.gl/DZkiai
REDDIT - https://goo.gl/jrO4eZ
BLOGGER - https://goo.gl/eqnZC4
DIGG - https://goo.gl/sZfJ2L
PINTEREST - https://goo.gl/Mm0159
AMEBA - https://goo.gl/7w9L9t
LINKEDIN - https://www.linkedin.com/groups/6964226/
My Channel on YouTube ♦СВОИМИ РУКАМИ Handmade DIY♦ - https://goo.gl/xMFhlG
My Channel on YouTube ♦СДЕЛАЙ САМ своими руками How to DIY♦ - https://goo.gl/fAwRV5
I love to diy a lot. Many of handmade things was and are very usefull ones in ordinary lifes. How to make some things? What crafts of craft should I choose? The constuction is main side of the creativity. At this field we must be able as to make insulation or padding as waterproofing and repairs or reperation, also pluster and fix ect. You must know some about welding and installation or disassembly of the different things.
Теги:
how to install standing seam metal roofing standing seam metal roofing installation basics pa standing seam metal roofing standing seam metal roofing installation standing seam metal roofing panels standing seam metal roofing installation instructi standing seam metal roofing systems installing standing seam metal roofing cutting standing seam metal roofing metal roofing metal roofing over shingles standing seam metal roofing video metal roofing installation roofing diy
Похожие видео
Мой аккаунт