
Wednesday, 14 January, 2026г.


Где искать: по сайтам Запорожской области, статьи, видео ролики
пример: покупка автомобиля в Запорожье
Shoeing a Draft Horse - Tips and Techniques Part 3 (Front Hoof Shoeing)
 У вашего броузера проблема в совместимости с HTML5
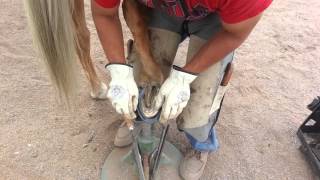
Michael Weildenstein, Certified Journeyman Farrier (CJF), begins this video discussing how to get a calm horse before shoeing. Although the farrier does not have control of the training of the horse, there are things he can control and things he cannot. Again he notes that a horse that has been exercised before shoeing tends to be calmer.
Factors Effecting Horse conduct:
1. Behavioral or general disposition
2. Lameness or other physical cause
3. Lack of Training
Michael discusses horseshoe shapes ands sizes. including
1. Width of web (should be twice the width of hte hoof wall)
2. Thickness of horseshoe (dependent upon the weight of the horse
and the wear and tear expected on the shoes)
Michael demonstrates using his forge and anvil to reshape his Percheron Pat's left shoe to fit perfectly. He then rasps the shoe to clean it up and bevel the horseshoe edges so they will not do any damage to the horse.
Michael applies leather horseshoe pads for hard surfaces such as
parades. Fit the pad to the shoe leaving a little excess. Michael uses a European trimming knife but one can one can use the nippers or a Sawsall. Hold the pad in place he uses a couple temporary nails. He then rasps the edges.
Next Michael applies the horseshoe pad and horseshoe in the following steps:
1. Rough the sides toward the hoof.
2. Apply hoof packing to the hoof filling in all voids between the pad
and hoof.
3. Apply the shoe and pad and nail it in place with a couple of nails.
4. Put hoof on the stand and rasp the edges of the pad to blend in.
5. Complete attaching the nails and removing the temporary nails.
6. Nail shoe nails in completely.
7. Put hoof back on stand and use clinches to make sure nails are at
90 degrees to the hoof.
8. Use rasp to file all the nails to the same length
9. Using clincher, bend all the nails down to tighten.
10. Complete the job with a final rasp to smooth everything.
Теги:
Rural Heritage horse shoeing horse shoes rural heritage magazine fitting horse shoes horseshoe pads
Похожие видео


Мой аккаунт