
Friday, 16 January, 2026г.


Где искать: по сайтам Запорожской области, статьи, видео ролики
пример: покупка автомобиля в Запорожье
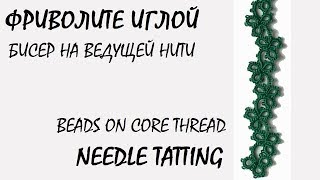
Needle tatting. Adding beads on core thread / Фриволите иглой. Как добавить бисер на ведущую нить
 У вашего броузера проблема в совместимости с HTML5
Free video lessons on needle tatting. Lesson 4. ↓↓↓EXPAND FOR MORE DETAILS ↓↓↓
In this tutorial, I will show you how to add beads to the core thread in tatting. If you don't know yet how to add beads onto the working thread, you may want to watch a tutorial on this topic as well - https://youtu.be/bJgrNi3wBhg.
_______________________________________________________
You can support my channel by:
♡ watching ads
♡ subscribing to my channel
♡ hitting Like button and sharing the video
♡ leaving your comments under the video
_______________________________________________________
For this project you will need:
- thread (in the video I use 100% mercerized cotton, 320 m/75 g),
- a long needle with a narrow eye,
- a crochet hook,
- a needle threader,
- scissors,
- a fine needle,
- beads (in the video I use Japanese beads №8).
Pattern - https://pin.it/laxq7nxgdzx6s3
1st ring - 5 stitches, a picot, 2 stitches, a picot, 5 stitches (1)
a chain - 2 stitches, a bead, 2 stitches, a bead, 2 stitches, a bead, 2 stitches (2)
a chain of 13 stitches (6)
If you've enjoyed the tutorial, hit the like button under the video and subscribe to my channel not to miss the next video!
_______________________________________________________
Detailed lessons on tatting basics - https://www.youtube.com/playlist?list=PLFFZdiD8uXQtNmiXqT91sD7LsAHk1GZuA
_______________________________________________________
#hobbypoint #needletatting #tattinglessons
Теги:
как добавить бисер в фриволите how to needle tat with beads фриволите иглой для начинающих фриволите фриволите иглой мастер класс уроки фриволите схемы needle tatting уроки фриволите фриволите для начинающих frivolite frivolite tutorial бисер handmade earrings хэндмейд фриволите МК как вплести бисер фриволите с бисером бисероплетение для начинающих frivolite su karoliukais бисер на ведущей нити beads on core thread beadweaving
Похожие видео

Мой аккаунт