
Thursday, 15 January, 2026г.


Где искать: по сайтам Запорожской области, статьи, видео ролики
пример: покупка автомобиля в Запорожье
How to Start Ubuntu in Safe Mode
 У вашего броузера проблема в совместимости с HTML5
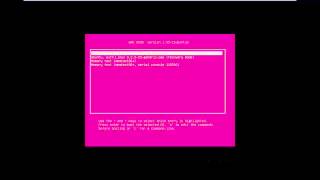
It is useful to open Ubuntu recovery mode if your system fails to boot. This can be done by opening it through the terminal application. Don't forget to check out our site http://howtech.tv/ for more free how-to videos! http://youtube.com/ithowtovids - our feed http://www.facebook.com/howtechtv - join us on facebook https://plus.google.com/103440382717658277879 - our group in Google+ In this tutorial we will guide you how to start Ubuntu in safe mode. In Ubuntu, the safe mode is called the recovery mode, and if the system fails to boot for any reason, It may be useful to boot it into Recovery Mode. To understand how to boot in Ubuntu recovery mode, follow the steps given below. Step 1 -- Type the command in the terminal application First of all, in the terminal, type the command sudo update-grub and hit enter. This will start testing our current GRUB menu to make sure whether it is working properly or not. GRUB stands for Grand Unified Bootloader. Step 2 -- Restart your session With that done, type shutdown -r now and hit enter. This command will restart your session. Step 3 -- Select the recovery mode option When the Ubuntu booting screen appears, press the Shift key twice or thrice to open up the GRUB menu. Once the GRUB menu opens up, select the recovery mode option from the menu and hit enter. Step 4 -- Select from the booting options After a bit of processing, the Recovery Menu will open up. Here, you will see many booting Options. Over here, we will select the "failsafeX" option and hit enter. Step 5 -- Continue remounting your file system In the next window, you will be asked whether you want to continue with remounting your file System in read or write mode. Select "Yes" and hit enter to continue with the process of opening Ubuntu in safe mode. Step 6 -- Wait for processing to complete Now wait a few minutes for the processing to complete, and after that, the login screen will appear right in front of you. And that's it. You have successfully started the Ubuntu in recovery mode.
Теги:
ubuntu safe mode safe mode boot in safe recovery mode ubuntu recovery mode linux safe mode start in safe mode safe mode linux ubuntu terminal ubuntu terminal linux tutorial ubuntu tutorial linux ubuntu commands wine ubuntu 13.04 ubuntu 12.04 how to ubuntu unity operation system linux os free os free linux review ubuntu review unix debian guide education manual the tutorial lesson video instruction tutorials howto how to how and howtech howtech.tv
Похожие видео

Мой аккаунт