
Friday, 16 January, 2026г.


Где искать: по сайтам Запорожской области, статьи, видео ролики
пример: покупка автомобиля в Запорожье
How To Nokia 2330 Classic Disassembly Screen Replacement And Repair Review
 У вашего броузера проблема в совместимости с HTML5
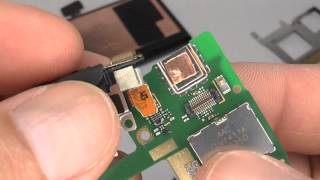
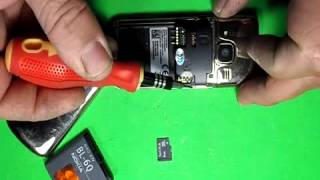
How To Nokia 2330 Classic Disassembly Screen Replacement And Repair Review Your back cover, remove the battery and SIM. Two screws circled below, need to be removed. Nokia 2330 Classic disassembly stage 1 to the right side of the cover to release it from the rest of the phone as a credit card to run. Nokia 2330 Classic disassembly stage 2 With the front cover removed your phone should look like below. Over the next five to remove the screws, circled below. Goes back to exactly the right place so that the screw on the upper left to make the rounds, is different from the other four. Nokia 2330 Classic disassembly stage 3, you should be able to lift the housing away from the main part of the phone. You now need to release the metal frame. It is necessary to pry you away from the frame to release the clips around the edge of the circuit board. Nokia 2330 Classic disassembly stage 4 should appear under your phone with the metal frame removed. Turn on the circuit board. A ribbon connector (circled) to disconnect. It attaches like a plug and socket. Just unplug the lever up. Nokia 2330 Classic disassembly stage 5 LCD screen is now on the loose, and as shown below, can be removed. Reverse the procedure for reassembly. This is useful if you isolate the guide, formymobile.co.uk the support and the tools and parts you need from our site please order. We shipped all over the world
Похожие видео


Мой аккаунт