Friday, 16 January, 2026г.


Где искать: по сайтам Запорожской области, статьи, видео ролики
пример: покупка автомобиля в Запорожье
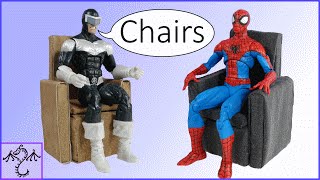
How to Make an Arm Chair for Action Figures or Dolls
How to Make an Arm Chair for Action Figures or Dolls
Today I’m going to show you how to make an arm chair for your 6 inch action figures or dolls to lounge in after a long day. This video contains the measurements specifically for Marvel Legends (6 inch, Bucky Cap body) but you can scale the chair up or down to fit your figure or doll.
The materials you’ll need for this project are:
Cardboard
Your choice of material to cover the chair (Half a yard will be more than enough fabric)
Scissors you don’t mind sacrificing to cutting up cardboard
Good scissors to cut the material
pencil
Craft glue
Low temperature glue gun
Glue sticks
A ruler or even better, a T-square. I purchased my T-square from Amazon at: http://amzn.to/1Yspx1q
Scaling the Chair for other Action Figures/Dolls:
To change the scale of the chair, measure your figure to determine the size of your chair. First measure from the bottom of the feet to the upper inside of the knee. That gives you the height of the seat of the chair (including the cushion).
The second second measurement is from the inside of the knee to the back of his or her butt. That lets us know the depth of the seat of the chair. Just as a heads up though, if you want to convert the simple chair to a deluxe chair, add a little bit more to your measurement to make room for the cushions on the back rest of the chair.
Next you need to know how wide to make the seat of the chair. Measure your figure at the widest part in a sitting posture (usually at the thighs or knees) and add another cm to the width.
Now you have the dimensions of the seat of the chair.
Next you’ll measure how tall the arms of the chair should be. Measure your figure in a sitting position to see how high the bottom of his or her elbows are off the floor.
Now how high should the back of the chair be? Chairs come in all kinds of styles so this part is completely up to you. I’m going with 11 cm on mine.
Dimensions of Cardboard:
Seat of Chair: 10 rectangles of cardboard of 5 cm by 4.5 cm to make the seat of the chair. Remember, if you’re not planning on adding any cushions to the back of the chair or a very thin cushion, you can cut your 10 rectangles 5 cm by 4 cm.
Chair Cusion: cut out one (or two) rectangle of 4.8 cm by 4.3 cm to make the cushion that sits on top of the seat. You want your cushion to be slightly smaller than the base of the chair because we’re going to cover it with fabric and that will make it a little larger.
Arms: cutting out 6 rectangles of 4 cm wide by 6.5 cm tall. Each arm of the chair will be made out of 3 of these rectangles, and we need two arms, so that’s why we are cutting out 6.
Back of Chair: cut 3 rectangles of 5 cm wide and 11 cm tall (or whatever height you prefer).
Gluing Cardboard:
Now that we have our cardboard cut out, we glue the 10 sheets of cardboard that make up the seat of the chair together using the craft glue. Next, glue three sheets of the arms of the chair together and do the same with the other 3 to make the opposite arm of the chair. Finally, glue the three rectangles that make the back of the chair to each other.
Cutting Fabric:
Seat of the chair: cut one long piece of fabric that is 5 cm wide and 17 cm long ( wrap around the front, top, back, and bottom of the seat of the chair). Cut two smaller rectangles to cover the sides of the seat that are 4.5 cm by 5.5 cm.
Arms:cut out 2 long rectangles of 4 cm wide by 15 cm long (wraps around top, sides, and bottom of arms). Cut 4 rectangles of 1.5 cm wide by 7 cm tall (covers front and back of arms).
Back: cut 1 larger rectangle of 5 cm wide and 24 cm long (wraps around top, front, bottom, and back of chair). Cut 2 rectangles of 1.5 cm wide and 11.5 cm tall (covers left and right side of back).
Seat Cushion: cut a rectangle of 8 cm by 7 cm, and a smaller one of 4.8 cm by 4.3 cm. (Glue larger piece down first and wrap around sides. Smaller piece covers bottom of cushion.)
Assembling Chair:
Assemble the chair by gluing the back of the chair to the seat of the chair. Apply glue to the seat of the chair and place it on a flat surface before pushing the back against the glue. Next, apply glue to the sides of the seat and attach the arms one at a time. Then just add your cushion to top of the seat and you have a completed simple arm chair.
If you enjoyed this video, I would really appreciate it if you could please give it a like and share it with your friends with similar interests. Feel free to check out my other videos and subscribe if you want to stay updated for the new videos I post several times a week. Thanks for watching!
Music: Youtube Free Music "Theres Probably No Time" There's Probably No Time by Chris Zabriskie is licensed under a Creative Commons Attribution license (https://creativecommons.org/licenses/by/4.0/)
Source: http://chriszabriskie.com/uvp/
Artist: http://chriszabriskie.com/
Теги:
How to make action figure prop how to make action figure chair how to make doll chair how to make toy arm chair do it yourself toy chair diy action figure prop diy toy chair how to make miniature arm chair how to make dollhouse chair how to make 1/12 scale chair crafting doll furniture how to make toy furniture toy crafting Zubbie Zubbie Creations Zubbiecreations acba articulated comic book art prop
Похожие видео
Мой аккаунт


 У вашего броузера проблема в совместимости с HTML5


