
Wednesday, 14 January, 2026г.


Где искать: по сайтам Запорожской области, статьи, видео ролики
пример: покупка автомобиля в Запорожье
How to Edit Video in Camtasia
 У вашего броузера проблема в совместимости с HTML5
This tutorial is going to show you how to edit screencast video in Camtasia.
Don't forget to check out our site http://howtech.tv/ for more free how-to videos!
http://youtube.com/ithowtovids - our feed
http://www.facebook.com/howtechtv - join us on facebook
https://plus.google.com/103440382717658277879 - our group in Google+
In this video you are going to learn how to edit video in Camtasia. This video assumes that you have already made the recording part of the video and are now looking to edit it. You will also need to have a recorded voice track to match the video before we begin.
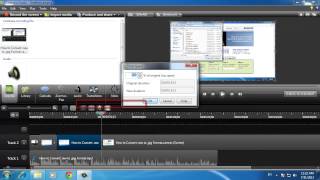
Step # 1 -- Opening Camtasia
You are going to need to start by opening "Camtasia Studio". This is one of two elements in Camtasia, you will have already use the other one "Camtasia Recorder" to record the screencast itself. In the top of the interface click the "Import Media" button and in the window that appears locate the recording file (camrec format) and audio file (mp3 fomat) that you created earlier. Press control on the keyboard and use the mouse to select both options.
Step # 2 -- Dragging the Files Onto the Timeline
The files will appear in your "Clip Bin" and you need to click on the audio file and drag it to track one - it will appear in the timeline below. Now click on the screen track and drag it to the create new track area. It will also appear in the timeline. Click and drag both of the clips to the left so that they are flush with the start of the timeline.
Step # 3 -- Cutting a Clip
Now we are going to need to edit the video track so that it matches up with the audio, there are several tools you are going to need to utilize to do this. How and when you use these will depend on your individual video. The first one is simply going to be cutting bits of the video out. Make sure only the video track is selected and then press the "S" button on the keyboard. Go to the second location you want to cut and repeat the process. You can now click the fragment between the two cut points and delete it by pressing delete on the keyboard. Now drag the later clip to the earlier clip and play it to make sure that the join is seamless. Jumps in the video look unprofessional and should be avoided.
Step # 4 - Speeding up the video
Another important way to match clips is adjusting the video speed. For example, you need to speed up the installation of programs so that there is not dead time in the video. To do this you will need to isolate the part of the video you want to speed up, just like how we did with the bit we wanted to remove before. Now right click on the clip we created and click "Clip Speed". A dialog window will appear and you will need to adjust the clip speed to a higher percentage (you can, of course, slow things down as well if needed). This requires a bit of experimentation so that it matched up perfectly with the audio. When done click "OK" and you will once again need to drag the later clip towards the one we just sped up.
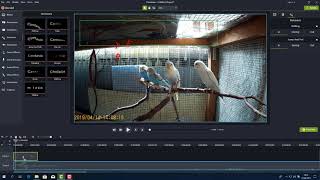
Step # 5 -- Highlights
Now let's have a look at how to highlight parts of the screen. Personally I would recommend that you only use one form of highlight as it gives a cleaner appearance. My preference is the red outline. Click "Callouts", click the expansion arrow and then click on the red square option -- the perfectly formed one looks neater. On the preview to the right you will see an outlined, you need to drag this and resize it over the area you want to highlight. When done click play and you will see that the animation appears. To tweak when it appears and disappears you can make changes in the timeline below.
Step # 6 -- Creating Zooms
Some users would advocate using zooms as they go along, but it is easier to do them after you have finished the rest of the video. When you have done all the chopping and highlighting, click anywhere in timeline and press "Control and A" on the keyboard, then press "Control and G" -- this will group everything together. Drag the player icon back to the start of the timeline and click "Zoom-n-Pan" above. Play the video and when you come to somewhere you want a zoom drag the points on the image in the top left to the area -- you can also click and drag the highlighted area to change the focus area. When you want to change the zoom again, such as when the focus is elsewhere, simply pause the video again and adjust the zoom in the top right.
Step # 7 -- Finishing Up
When you have finished with the zooms you should have a good overall result. All you need to do then is export the video in whatever format you want and that's a basic introduction on how to edit videos in Camtasia Studio.
Теги:
edit video in camtasia edit video how to edit videos split video cut video speed up screencast video speed add music speed up video highlight zoom montage video editing camtasia camtasia studio camtasia recorder camtasia studio 8 camtasia recorder 8 camtasia 8 camtasia screen recorder camtasia tutorial how to use camtasia camtasia video techsmith multimedia media guide education manual the tutorial lesson video howto how to how and howtech howtech.tv
Похожие видео
Мой аккаунт