
Saturday, 17 January, 2026г.


Где искать: по сайтам Запорожской области, статьи, видео ролики
пример: покупка автомобиля в Запорожье
??How to do a Shadow Root at Home – Hair Tutorial for Blondes
 У вашего броузера проблема в совместимости с HTML5
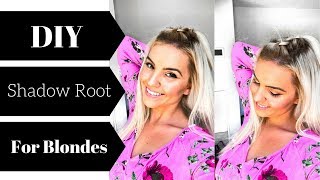
All my non-natural blondes say hey-o! As you sadly may know, I wasn’t born a blondie – my blonde hair comes from a bottle. I’ve been going blonde since high school, but I’ve been going super blonde for about 2 years now. Recently, I started to hate the harsh root line - I have a dark black line with bleach blonde hair.
I was inspired by a photo I found on Pinterest of a girl with beautiful platinum blonde hair and a dark natural looking root. I decided to go down to Sally's, pick up a bottle of dark brown hair color and here you have my Shadow Root tutorial!
I'm absolutely in love with the result and it looks so natural - just like my inspiration from Pinterest.
| full blog post with before + after pictures here: |
https://monikaboch.com/diy-shadow-root/
????????????????
| PRODUCTS I USED |
Demi-Permanent Color - Medium Ash Blonde 7A
http://bit.ly/2L9UPtV
Sensitive Scalp 20 Volume Creme Developer
http://bit.ly/2NFTxbs
Color Charm Lightest Ash Blonde Toner T-18
http://bit.ly/2L8g672
Hair Color Mixing Bowl (I used 2)
Hair Dye Brush x 2 (I use one for the bleach, one for the toner)
Clips
https://rstyle.me/~amTNx (this link is for the above 3 products)
Gloves
Comb
Hair Cape or an Old T-Shirt
| STEPS|
Step 1
Dye your hair the color of your dreams. If you are looking to bleach your hair to a bleach blonde like mine, check out my tutorial on – HERE.
[ https://youtu.be/Ftw8bIJiajI ]
Step 2
Gather all your materials
Step 3
Section your hair into 4 sections. Taking your comb, start by making a straight part down the center of your head. Brush the hair into the 2 sections. Taking your comb again, make a straight line from the back of your ear up. Do this on both sides so that you have 4 even sections.
Step 4
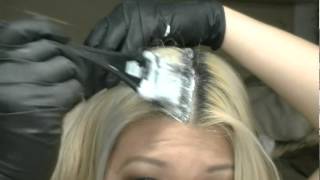
Mix the dye. Pour all the contents of the demi-permanent dye into the mixing bowl. Slowly add in a small amount of the developer. Mix until it has the consistency of pudding.
Step 5
Drape your cape over your shoulders or put on your old T-Shirt. Start by going down the center part, then down each of the side sections. Once you have bordered the four sections on your head, start to make paper thin sections. Use the end of your dye brush to make the tiny sections. Once you’ve completed the front 2 sections, move to the back.
The key to making the shadow root look natural is to not be precise. You can let some sections be more covered than others. Overall it will blend more in the end.
Step 6
Once your roots/hair are covered in the dye, carefully clip up the rest of your hair. Try not to get the ends covered in the dye – if you do, quickly rise it off. The, take the plastic bag and wrap it around your head. The bag will help trap the heat and speed up the process. Let the color process for 20 minutes. After the time is up, rinse the color out.
Step 7
Mix the toner. Empty the whole bottle of toner into a clean bowl. Add in the developer and mix until it has that pudding consistency.
Step 8
Apply the toner to the hair that was just colored. Allow to process for 3-5 minutes. Then apply the toner to the ends of the hair. Let process for a few minutes – being aware of the color changing effect.
Step 9
Then rinse, shampoo + condition as usual. Now style and enjoy!
| Follow me on |
Instagram: https://www.instagram.com/monika.boch
Facebook: https://www.facebook.com/mamablondeinka
Blog: https://monikaboch.com/
????????????????
[ Disclaimer: I’m not a hairdresser. Use caution before using all of the products. If you have never had bleach on your scalp before, do a spot test and wait 24 hours. Do not leave the bleach on too long or you can seriously damage your hair and scalp. Wear gloves to protect your hands. Use your best judgment – I cannot be held liable for any damage that is done by following this tutorial. ]
Теги:
shadow root blonde hair platinum blonde how to do hair hair tutorial color hair dye hair at home shadow root blonde hair blonde ASH blonde monika boch hair how to tutorial how to do a root melt at home hair how to how to do a root melt how to tone hair at home how to dye your hair platinum blonde with shadow root how to bleach hair how to dye your roots at home
Похожие видео
Мой аккаунт