
Monday, 19 January, 2026г.


Где искать: по сайтам Запорожской области, статьи, видео ролики
пример: покупка автомобиля в Запорожье
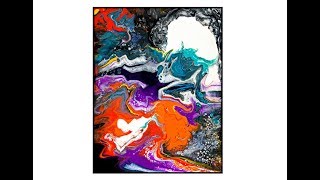
Fluid Acrylic Pouring A Playful Fast Dirty Very Abstract Expressionist Composition # 5569B 8.11.19
 У вашего броузера проблема в совместимости с HTML5
For information about purchases, please contact me at [email protected]
To Receive Notifications, turn on notifications on your settings & click the bell near subscribe.
Your thumbs up are immensely appreciated! If you appreciate my art, the processes, or my efforts in general. Artworks are all for sale by request, inquiries welcomed.
To shop materials without any additional cost to you available visit
https://www.amazon.com/shop/expressionistartstudiogallerypriscillabatzell?ref=ac_inf_tbvh
Please assist me to continue making video tutorials and buy supplies by contributing here https://www.paypal.com/cgi-bin/webscr?cmd=_s-xclick&hosted_button_id=3NFL85WZ3M5VG
Artworks are all for sale, inquiries welcomed.
To donate to help the studio/be a Patron go here
https://www.patreon.com/EAStudioGallery This helps make my studio usable for an indoor working/teaching/gallery space.
Just for fun, not attempting a masterpiece.
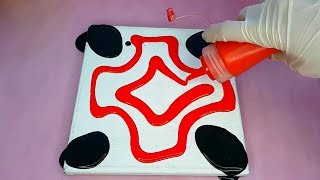
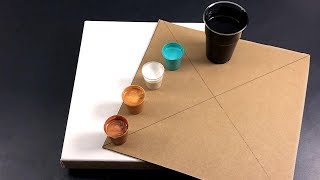
I am using a 16"x20" stretched canvas. I create a "dirty " container of colors. I add lots and lots of colors. I DO NOT prime the canvas first with any wet paint in advance. I Use the whole container allowing all the paint to flow from one of its flat sides in a huge stripey ribbon. After depositing all the paint, I add more black and white paint( from my squeeze bottles of pre-mixed paints with additives mixed into them) to help the mass of paint flow more easily and allow more of the colors I see to remain visible. That's when I begin to tilt the canvas to flow the paint and cover the canvas. I stop the paint from escaping by holding an edge catcher against the canvases side. The paint flows to the catcher and pools. I allow the pooled paint to flow back again into the colors, and I also use the residuals on the catcher by removing them with a silicone spatula. Where the canvas is void of paint, I add more bottled paint to help flow the colors again. I use to add more paint and use a small silicone spatula to swipe it in areas I want it. I continue to tilt the canvas over and over until its completely covered, and I am fairly pleased with my result.
My "pouring" mixture or "recipe" is simple- and starts with 2 parts(estimated) Gac 800 from "Golden "added into any acrylic paint color 8 parts, (amounts are always estimated) This starts the mixing process. Mix the paint and Gac thoroughly. Next, I add my mixed Floetrol and (half )Deco Art pouring medium. (shake it first every time! )The truth is; lately, that's my go-to. I add the same (or more) ounces as the first two ingredients and mix everything thoroughly. The consistency is usually medium body/ weight, but other weights are usable with minor adjustments.
To mix, if you use squeeze bottles as I do, add a marble and shake your paints every time before you use them. All my acrylic paints are mixed in advance and contained and stored in squeeze bottles. If you are not using squeeze bottles, I suggest using a container that has a lid. I have often used the 4oz size plastic deli containers, and the paint keeps for a long time in them, but you still will have to stir before using the mix again because the Floetrol and other flow agents will rise to the top between uses. None of my acrylic paint has any added silicon. To create the pearlescent effects seen in most of my artworks, I use "Golden's" Iridescent pearl "Fine" added to colors. By "eye " until I am pleased with what I see.
Every day I learn new things. I will never stop experimenting, and I am happy to share what I discover with you.
To see finished wet and dry versions of all my Youtube demonstration artworks for sale visit my Expressionist Art Studio Gallery Fans and Collectors group on Facebook
#5568A wet.shown in this video.
Find My Pinterest Boards
https://www.pinterest.com/PriscillaiSky/
Find me on Instagram
https://www.instagram.com/expressionistartstudio/
https://twitter.com/expresionistart
Теги:
fluid acrylic pouring fluid acrylics pouring priscilla batzell expressionist art studio gallery abstract expressionist artwork flow art Fluid acrylics tutorial fluid acrylic pouring painting fluid acrylic pouring tutorial fluid acrylic pouring techniques priscilla batzell art for sale fluid painting acrylic painting tutorial acrylic pouring flow artist expressionist art studio gallery priscilla
Похожие видео
Мой аккаунт