
Tuesday, 13 January, 2026г.


Где искать: по сайтам Запорожской области, статьи, видео ролики
пример: покупка автомобиля в Запорожье
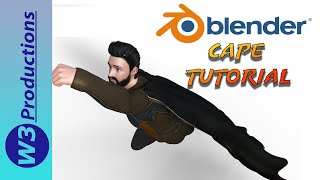
Blender Cape Animation Tutorial - Cloth Simulation Blender 2.8
 У вашего броузера проблема в совместимости с HTML5
In this Blender Cape Animation Tutorial you will learn how to add a basic cape to your 3d Character and create realistic physics for the cape. This is all done through Blender Cloth Simulation. So this is bascially a Blender 2.8 Cloth Simulation Tutorial.
This Blender 2.8 Cloth Physics Tutorial will demonstrate how to apply cloth physics to a 3D mesh, pin a 3D cloth to a vertex group, parent the cape to the 3D Character. As an optional step, we use a shrink wrap modifier to create the collar of the cape. This is an alternative to using the sewing cloth physics which can get complicated.
This Blender Cloth Tutorial uses lower quality steps in the baking simulation. Be sure to up those values to obtain a better result. Also feel free to change other cloth values in order to get interesting results for the cape.
If you are interested in bring Daz Studio characters into Blender 3D, here is a playlist of some tutorials: https://www.youtube.com/playlist?list=PLLOAIDS7149fpfag6MU73SQfIS7foU0B6
Here is a Node Wrangler tip for quickly setting up realistic materials with image textures:
https://youtu.be/DIRZIz-eQps
Cape Tutorial
1:28 - Adding Example Mesh (Cube or UV Sphere)
1:53 - Adding Collision Physics (Physics Context Tab) to Object Mesh
2:45 - Modeling Cape from Object Mesh (Adding a Mesh Circle and Extruding it out to desired length)
9:10 - Add collar vertices to Vertex Group for Cloth Pinning
10:48 - Add SubDivision Surface Modifier to Cape Mesh
11:38 - Add Solidify Modifier for Cape Thickness
12:06 - Add Shrinkwrap Modifier to form collar around Character Mesh
13:48 - Add Cloth Physics for Simulation and associated settings
15:15 - Cloth Pinning
17:00 - Adding a PBR Material for the Cape using Image Textures for the Principled Shader
18:03 - Node Wrangler Shortcut for quickly setting up Image Textures
18:35 - Obtaining PBR Image textures from Textures.com
20:09 - Actually using the Node Wrangler shortcut
20:55 - Animating the character to give Cape more to do (Floating Character)
21:50 - Using Blender 2.8 Animation Layout
22:55 - Duplicating Keyframes to quickly repeat repetitive motion
23:40 - Adding Wind Force Field to make Cape blow in the wind
24:40 - Baking Cloth Simulation
25:20 - Examine Baking Results
26:30 - Final Thoughts and Reminder to Subscribe
Thank you for watching this video on Blender Cloth Physics.
Website: w3productions.com
Twitter: twitter.com/W3Productions1
Теги:
blender cape animation blender cape blender cape 2.8 blender cape physics blender cape rig blender cape tutorial blender 2.8 cloth blender 2.8 cloth physics blender 2.8 cloth pinning blender 2.8 cloth self collision blender 2.8 cloth sewing blender 2.8 cloth simulation blender 2.8 cloth simulation tutorial blender character animation blender cloth blender cloth animation blender cloth physics blender cloth rigging blender cloth simulation
Похожие видео
![[2.8] Blender Tutorial: Cloth Animation in EEVEE](/images/mq/2/94/fEzRwgzs9j7Tdf.jpg)
Мой аккаунт