
Tuesday, 13 January, 2026г.


Где искать: по сайтам Запорожской области, статьи, видео ролики
пример: покупка автомобиля в Запорожье
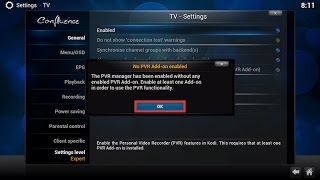
2016 Fix no pvr addon enabled . Israeli live kodi addon using PVR
 У вашего броузера проблема в совместимости с HTML5
This video will show you how to enable your pvr. This video will not show you how to set up the pvr only enabling it. There are currently two pvr addons i use for GET SMART MEDIA WORLDWIDE clients.
Basic: PVR IPTV SIMPLE CLIENT
or
VIP: STALKER CLIENT
IF YOU WANT TO USE ISRAELI LIVE ADDON FOR KODI HERE ARE DIRECTIONS HOW TO INSTALL IT.
Kodi AddonsHow To Install IsraeLive Addon On Kodi Kaiser Bhat 3 Months Ago No Comments
PREV ARTICLE NEXT ARTICLE
IsraeLIVE Addon Kodi is the great IPTV Addon that allows you to watch Live TV channels and Radio Channels from UK, USA, Israel, Saudi Arabia, Russia and lot of other countries.The best thing about IsraeLIVE Addon is that when you will install it on Kodi you will get both Live TV Channels and TV Guide on Kodi.
Once you will install IsraeLIVE Addon on Kodi you will get two new sections (TV and Radio) on the main screen of your Kodi through which you will be able to see all Live TV channels and Radio channels. Under TV section when you will click on Channels you will be able to see the Channel Name and its Icon but if you will click on Guide option under TV section you will able to see Channel Name, Channel Icon and its Schedule.
Editor's Note
If you plan on streaming content via any of the Kodi addons we recommend using a VPN. A VPN will anonymize your online activity, protect you from spying ISPs, and allow you access to geo-blocked add-ons and content.
We personally use IPVanish VPN and highly recommend it. You can sign up for IPVanish VPN here or if you want to know more about why to use a VPN with Kodi click here
IsraeLIVE Addon
IsraeLIVE Addon Kodi
Before installing IsraeLIVE Addon on Kodi you must Enable PVR IPTV Simple Client in Kodi
Follow the below instructions to install IsraeLive Addon on Kodi:
01. Start your box as normal and then go into Kodi
02. Once you will be inside Kodi then select System from the main screen of Kodi and then click on File Manager
03. Click on Add Source
04. Click on None(Text box) and Keyboard will popup on the screen
05. Type in the web address http://fusion.tvaddons.ag and click on Done
06. After that click on Text Box underneath “Enter a name for this media Source”, type fusion and click on OK
07. After that you need to return back to the main screen of Kodi by pressing the return button(Back arrow)
08. Click on System
09. Click on Addons
10. Click on Install from zip file
11. Click on fusion
12. Click on xbmc-repos
13. Click on International
14. Click on hebrew.repository.xbmc.israel-x.x.x..zip
15. Wait for Addon enabled notification at the bottom right corner of the screen
16. Click on Install from Repository
17. Click on .XBMC Israeli Streaming Sites
18. Click on Video addons
19. Click on IsraeLIVE
20. Click on Install
21. While installing IsraeLIVE Addon you will get the popup(Do you want to use IsraeLive Lists for LiveTV) on the screen and then click Yes
22. Once the Addon will be enabled you will get another popup(Please restart XBMC/Kodi) on the screen, press OK and then Exit Kodi
23. Now go back into Kodi and inside Kodi you will find two new sections ( TV and Radio) on the main screen of Kodi
24. For watching Live TV channels you need to select TV section and under TV you will find different options like Channels, Guide, Recording, Timers and Search
25. Click on Channels if you just want to watch Live TV channels but if you want to watch and check the schedule of individual channel then you need to click on Guide option under TV section.
25. For listening to Radio you need to select Radio section and under Radio you will find same options as you find under TV section
Dont forget to check us out online
http://facebook.com/getsmartmediaworldwide
or
http://koditvaddons.com
Похожие видео


Мой аккаунт